<< 소스 코드 >>
import 'package:flutter/material.dart';

void main() => runApp(MyApp());

class MyApp extends StatelessWidget {
  const MyApp({Key? key}) : super(key: key);

  @override
  Widget build(BuildContext context) {
    return MaterialApp(
      debugShowCheckedModeBanner: false,  //우측 상단 Debug 띠 제거
      title: 'BBANTO',
      home: Grade(),
    );
  }
}

class Grade extends StatelessWidget {
  const Grade({Key? key}) : super(key: key);

  @override
  Widget build(BuildContext context) {
    return Scaffold(
      backgroundColor: Colors.amber[800],
      //상단 Title 영역에 BBANTO AppBar 추가,
      appBar: AppBar(
        title: Text('BBANTO'),
        backgroundColor: Colors.amber[700],
        centerTitle: true,  //AppBar에 타이틀을 중앙정렬 시킴
        elevation: 0.0,     //elevation을 사용하여 AppBar의 입체감을 없앰.
      ),
      // body에 포함되는 모든 위젯의 여백을 지정
      body: Padding(
        padding: EdgeInsets.fromLTRB(30.0, 40.0, 0.0, 0.0),
        //Column 위젯으로 세로로 위젯을 정렬
        child: Column(
          //crossAxisAlignment: NAME과 BBANTO 문자열의 시작점을 정렬하기 위해 사용
          crossAxisAlignment: CrossAxisAlignment.start,
          children: <Widget>[
            //Center 영역에 CircleAvatar 위젯으로 둥근 이미지 추가
            Center(
              child: CircleAvatar(
                backgroundImage: AssetImage('assets/circle.png'),
                radius: 60.0,
              ),
            ),
            //이미지 아래 구분선 추가
            Divider(
              height: 60.0, //Divider 위아래 간격이 60 픽셀이라는 의미.
              color: Colors.grey[850],
              thickness: 1.2,
              endIndent: 30.0,
            ),
            //NAME 문자열 위젯 추가
            Text('NAME',
              style: TextStyle(
                color: Colors.white,
                letterSpacing: 2.0,
              ),
            ),
            //SizedBox를 사용하여 NAME과 BBANTO 문자열 사이 간격을 추가
            SizedBox(
              height: 10.0,
            ),
            //BBANTO 문자열 위젯 추가
            Text('BBANTO',
              style: TextStyle(
                color: Colors.white,
                letterSpacing: 2.0,
                fontSize: 28.0,
                fontWeight: FontWeight.bold,
              ),
            ),
            //SizedBox를 사용하여 BBANTO와 BBANTO POWER LEVEL 사이 간격 추가
            SizedBox(
              height: 30.0,
            ),
            //BBANTO POWER LEVEL 문자열 위젯 추가
            Text('BBANTO POWER LEVEL',
              style: TextStyle(
                color: Colors.white,
                letterSpacing: 2.0,
              ),
            ),
            //SizedBox를 사용하여 BBANTO POWER LEVEL과 14 사이에 간격 추가
            SizedBox(   //NAME과 BBANTO 문자열 사이 간격을 위해 SizedBox 삽입
              height: 10.0,
            ),
            //14 문자열 위젯 추가
            Text('14',
              style: TextStyle(
                color: Colors.white,
                letterSpacing: 2.0,
                fontSize: 28.0,
                fontWeight: FontWeight.bold,
              ),
            ),
            //SizedBox를 사용하여 14와 능력 문자열 사이에 간격 추가
            SizedBox(
              height: 30.0,
            ),
            //가로 정렬방식으로 위젯 추가
            Row(
              children: <Widget>[
                //체크 Icon 추가
                Icon(
                    Icons.check_circle_outline
                ),
                //체크 Icon과 문자열 사이 간격 추가
                SizedBox(
                  width: 10.0,  //가로 여백이라 width를 사용함
                ),
                //using lightsaber 문자열 위젯 추가
                Text(
                  'using lightsaber',
                  style: TextStyle(
                    fontSize: 16.0,
                    letterSpacing: 1.0,
                  ),
                ),
              ],
            ),
            //가로 정렬방식으로 위젯 추가
            Row(
              children: <Widget>[
                //체크 Icon 추가
                Icon(
                    Icons.check_circle_outline
                ),
                //체크 Icon과 문자열 사이 간격 추가
                SizedBox(
                  width: 10.0,
                ),
                //face hero tattoo 문자열 위젯 추가
                Text(
                  'face hero tattoo',
                  style: TextStyle(
                    fontSize: 16.0,
                    letterSpacing: 1.0,
                  ),
                ),
              ],
            ),
            //가로 정렬방식으로 위젯 추가
            Row(
              children: <Widget>[
                //체크 Icon 추가
                Icon(
                    Icons.check_circle_outline
                ),
                //체크 Icon과 문자열 사이 간격 추가
                SizedBox(
                  width: 10.0,
                ),
                //fire flames 문자열 위젯 추가
                Text(
                  'fire flames',
                  style: TextStyle(
                    fontSize: 16.0,
                    letterSpacing: 1.0,
                  ),
                ),
              ],
            ),
            //다음 위젯의 중앙정렬을 위해 Center 사용
            Center(
              //둥근 이미지 삽입을 위해 CircleAvatar 위젯 사용
              child: CircleAvatar(
                backgroundImage: AssetImage('assets/sanrio.png'),
                radius: 40.0,
                backgroundColor: Colors.amber[800],
              ),
            )
          ],
        ),
      ),
    );
  }
}
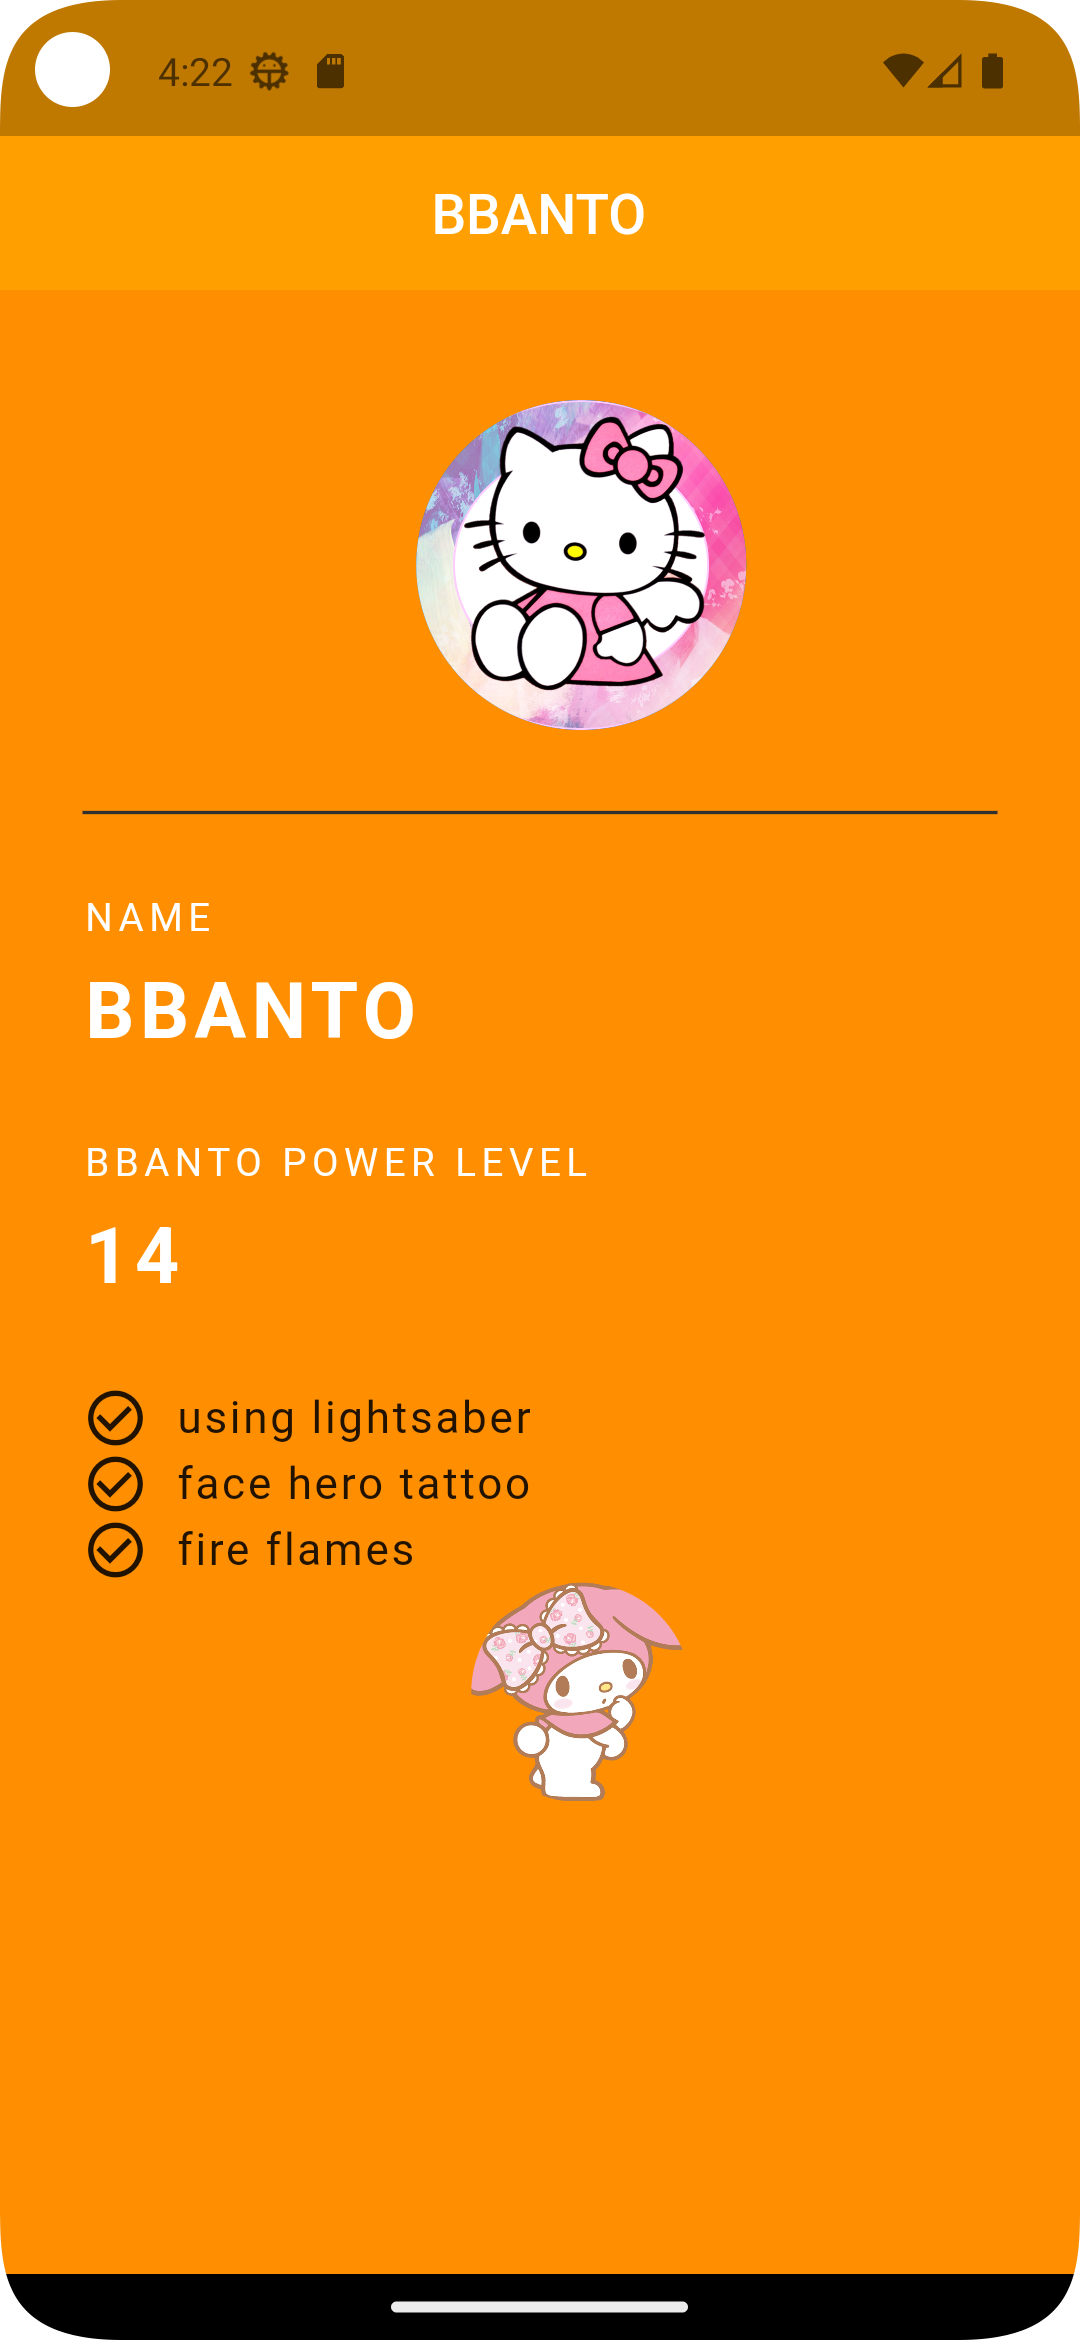
<< 출력 화면 >>
'Flutter (with 코딩셰프)' 카테고리의 다른 글
| [2023.11.21] 플러터(flutter) 순한 맛 강좌 15 | Drawer Menu #1 (0) | 2023.11.21 |
|---|---|
| [2023.11.20] 플러터(flutter) 순한 맛 강좌 14 | AppBar (1) | 2023.11.20 |
| [2023.11.16] 플러터(flutter) 순한 맛 강좌 10 | 캐릭터 페이지 디자인#2 (0) | 2023.11.16 |
| [2023.11.15] 플러터(flutter) 순한 맛 강좌 9 | 위젯정렬 (0) | 2023.11.15 |
| [2023.11.03] 플러터(flutter) 순한 맛 강좌 7-8 | 플러터 앱페이지 기본코드 이해하기 (0) | 2023.11.03 |


